With the economy the way it is, I thought I'd share some of my ideas for heirloom sewing on a budget.
1. Shop the sales. Why state the obvious? Because sometimes we forget to do that!
2. The same goes for using your stash!
3. Use wider width fabrics when available. For slimmer dresses, 58-60" is sometimes plenty of fabric width for the skirt, meaning you only need to purchase one skirt length. Most of our fabric needs are for the skirt sections. With a wider fabric, you don't even have to make side seams! Just put one seam (the selvages together) in the center back. This means your sleeves may have to be sewn-in "in the round," but that doesn't bother me a bit. 45" is even wide enough for a tiny baby dress! Another way that the wider fabrics can save money is by reducing the total length of fabric you need to buy: if you need 2 skirt sections, each one about 35" wide, then from a 60" wide fabric, you would have a 23-25" width of fabric that is the length of the 2 skirt sections in which to cut your bodice and sleeve pieces, with some left over!
4. Lace beading usually costs a lot less than lace insertions, so if you mix some beadings in with your insertions on fancy bands and yoke treatments, you can save on the lace purchase. Satin ribbon is quite reasonably priced and really makes an outfit shine!
5. Swiss insertions bordered by entredeux are often overlooked. Initially they seam pricey ($5-8) per yard, but with entredeux running nearly $3/yd. now, enough entredeux to go around two sides of lace insertion would cost nearly $6/yd. At this point, the embroidered section between the entredeux is nearly free! This product also makes wonderful waistbands on dresses, sleeve cuffs and adds dimension and detail to a yoke or fancy band. I've even used it in the side seam to expand the width of the dress! If a pattern calls for a smocked garment's skirt to hang from lace and entredeux, I would prefer to use the swiss insertion as it is much stronger and better able to support the weight of the skirt. Swiss beading is a wee bit less than insertion and can be used in the same places and techniques.
6. Using edging lace or swiss embroidered edgings at the hemline of a dress can save money because the shirt section will be shorter than if you use a fabric hem. Judicious placement of fabric within a fancy band can give you a place in which to add more laces and other design features to lengthen a dress that still fits the child around the bodice.
7. Vary the widths and patterns on your laces. Two wider laces separated by a narrow lace is really pretty! Choose lace patterns that initially cost less per yard because once the dress is finished, it will look great! The lace pattern itself seems to matter less than the fact that the dress has been embellished with lace.
8. Tucks. Any kind of tuck can fancy up a skirt. Yes, you need more fabric, but in the long run fabric costs less than lace! On the first french dress I made for my DD, I placed 3 half-inch tucks just above the fancy band. My DD was always very slim and grew up and never out, so to extend the life of the dress, I removed the stitching from those tucks the 2nd year, and used my pintuck foot to place 3 groups of 3 pintucks using the fold and stitching lines from the original half-inch tucks. This not only concealed the folds in the fabric, but it allowed me to stitch really straight since I had a mark to follow across the whole width of fabric!
9. Puffing can be made from scraps of fabric, and it looks really good when placed in a dress! It is one thing that looks fancier than it really is! Puffing, pintucks and pin-stitching are all things that don't cost a lot, do use up some time, but look very effective in the finished project.
10. For smocked print dresses, you can mix and match fabrics, prints and solids. By using contrasting hem bands, cuffs and collars, you can use up smaller bits and pieces in your stash than if trying to make a whole outfit out of one fabric. Contrasting hems are another great way to add length to a dress when it gets shorter. Line your bodice with another coordinating fabric to save on the feature fabric.
11. Piping. Another thing that takes very little fabric. Make your own! You can cut your own bias strips from scraps. For any straight edges (yokes, hems and cuffs) that need piping, you can even cut it straight on the cross-grain. Use piping liberally for great effects without upping the budget. Gingham and stripes make wonderful bias pipings! Contrasting pipings in seam allowances can really brighten up a dress or boy's outfit. Even if you don't like yellow (which I didn't), it is the one color that make almost any project "pop" when used in small amounts for contrast.
Cathy
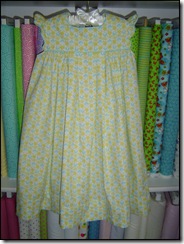 Hillary features pleats at center front and gathers to the armholes. I used the scallop angel sleeve pattern featured in Creative Needle May/June 2004 issue.
![clip_image001[4] clip_image001[4]](http://lh5.ggpht.com/_Nc4PUvqDiqA/SZIklQq1xEI/AAAAAAAAAI4/yIUJAH5k6fs/clip_image001%5B4%5D_thumb%5B1%5D.jpg?imgmax=800)
